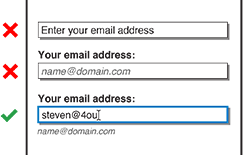
Most errors result from assuming people are like computers and making them do work they shouldn’t have to do or to work the way a computer works. You can go a long way toward solving user’s input issues by using simple data formatting and restricting data entry. Modern mobile operating systems offer enhanced capabilities for data entry by providing
- different, context-specific key layouts for virtual keyboard—for example, numeric entry for phone-number fields and the appropriate characters and strings for email-address fields
- date pickers and other widgets that allow selection from a list of values, which are highly useful and now increasingly available even for Web forms
But many form fields still rely completely on users tapping characters on a virtual keyboard, so errors can occur. For example, a user might provide a phone number comprising too few characters—even if the field has the right data-entry format—or accidentally tap the @ symbol twice when inputting an email address. (For some reason, I do this a lot.)
Most Web sites require users to completely fill out and submit a form before validating any data. Then, once the system processes the form, if any data-entry errors have occurred, it returns an error page. While this is common practice, I would argue that it approaches being a worst practice.
A better practice is to provide inline validation of fields in Web forms. Back in 2009, Luke Wroblewski wrote “Inline Validation in Web Forms,”![]() a rather good article that described both the concept of and the principles behind inline validation. (If you don’t yet know what I am talking about, seriously, stop reading this column now, go read Luke’s article, then come back once you’ve read it.)
a rather good article that described both the concept of and the principles behind inline validation. (If you don’t yet know what I am talking about, seriously, stop reading this column now, go read Luke’s article, then come back once you’ve read it.)
Guidelines for Inline Validation of Fields in Web Forms
To summarize Luke’s key inline validation guidelines:
- When a user clicks or tabs to another field to select it—that is, on blur—the system should check whether the value the user typed in the previous field was valid. (You can achieve this validation either by using client scripting or Ajax methods to check the value on a remote service.)
- Do not perform these checks as the user types. (A possible exception to this general rule is checking password strength, but that’s another discussion.)
- Highlight the field that is in error—for example, by changing its color.
- Indicate the error by persistently placing an icon adjacent to the field, not inside it. This icon should not fade away.
- Explain errors in a helpful manner, so users can understand what they need to do correct them.
- Make sure explanations of errors do not obscure other fields. Ideally, these explanations should also be persistent and should not require a user to click anything to view them.
Applying Inline Validation Guidelines to Web and Mobile Applications
When I read these inline validation guidelines, I believed in them 100 percent, because my own experience over the four years that preceded Luke’s article had corroborated them. (Unfortunately, I wasn’t allowed to talk or write about what I’d learned from user research in those days.)
At that time, I worked for the U.S. mobile telecom company Sprint, and one of my projects was designing a new registration form. We had to get every one of the existing 20 million customers to re-register, because of new CPNI (Customer Proprietary Network Information) regulations from the FCC (Federal Communications Commission). (I actually contributed to those CPNI regulations, but that's a long story and, though a rather good one, not relevant here.)
This form included the first robust and completely consistent use of inline validation that I am aware of. I made some guesses and took input from the rest of the product team, then tested the design. And revised it and tested again. It worked—and not only in the lab. We had great completion rates and low dropout rates, and participants reported no problems. We received weekly call driver reports from customer care, so knew what caused issues for users. Registration never even appeared in those reports.
I have used the same approach for the inline validation of Web forms since, with the same positive results. I am completely sure it works. In the last few years, I’ve been applying a similar approach to designing forms in mobile user interfaces. Recently, I realized that, to the best of my knowledge, no mobile-specific recommendations for inline validation have yet been published. So, I think it's time that I shared mine.
While I don’t have as much research to back the mobile variations of these recommendations as I have for inline form validation on the desktop, I do have some. The guidelines for inline validation on mobile devices derive from the same principles as those for the desktop, and they do not violate any other principles of good UX design for mobile. Both in the smaller-scale tests that I have observed and in production, this approach seems to work well. Anyway, these guidelines provide a good place to start the conversation. I encourage you to try applying them and report your results, and I’ll continue to try out and test new ideas whenever I can on my clients’ projects. If I discover important differences, I’ll tell you about them.
You can apply all of these principles and guidelines to both the mobile Web and mobile apps. While implementations may vary, the end result should be very similar.
My examples show handset-scale solutions, but for devices with larger screens, such as tablets, you may be able to use layouts from desktop Web form solutions—for example, adding explanations to the right of form fields. The appropriate layout depends on the space you actually have. But if a page has a multicolumn layout, you won’t have much room, so handset-scale solutions would still tend to apply, without any modification.
Visibility
When designing inline form validation for mobile devices, the key issue is making sure users notice the error messages. Here are my recommendations to ensure visibility.
Design for color-deficient vision.
Assume that everyone has color-deficient vision, follow design guidelines for the use of color, and use some of the available tools![]() to ensure that your designs won’t present any problems to those who have a color deficit. Even disregarding the significant percentage of your users who actually have a color deficit, people’s ability to perceive color varies; there are many people who see colors slightly less intensely. On mobile devices, the screen may be dirty or under glare. Just changing a field’s black border to red may not be sufficiently visible.
to ensure that your designs won’t present any problems to those who have a color deficit. Even disregarding the significant percentage of your users who actually have a color deficit, people’s ability to perceive color varies; there are many people who see colors slightly less intensely. On mobile devices, the screen may be dirty or under glare. Just changing a field’s black border to red may not be sufficiently visible.
Draw users’ attention to error messages.
On mobile devices, the typical behavior is to enter data in the first field, then select the next field—usually by using Next buttons, tab keys, down arrows, or just tapping the next field—at which point, any error message for the previous field appears.
Users’ attention is very focused on their current data-entry field. You’d be surprised by how little they notice changes just one line above the field in which they’re entering data. Their eyes flit between the field, the data-entry device—either a hardware or a virtual keyboard—and their surroundings. They do not pay much attention to the rest of the screen—unless you work very hard to get their attention.
You cannot evaluate your success in getting users’ attention in a vacuum—or by testing static screens you’ve created in Photoshop or Fireworks.
Employ motion, position, size, shape, contrast, and color.
To get users’ attention, you need to appeal to their eyeballs and their brains. Using an understanding of cognitive science and physiology, synthesized through principles of information design, we know that an alert outside a user’s area of focus must have one or several of the following characteristics of information visibility, in priority order:
- motion—Think animation. Create motion by fading in, sliding, rotating, or otherwise moving or changing an element. At a minimum, you should animate icons for at least 500 milliseconds. For example, you might spin a processing icon while validating data, then change it to an icon that indicates an error or valid state.
- position—In information design, the presence and relationships of objects communicate the priority of information. In hierarchical relationships, things higher in a view are more important. Adjacency also implies a relationship.
- size—As a general rule, bigger things are more visible. However, size has only limited usefulness in the context of a form.
- shape—Shapes can have implications. For example, the international warning triangle is not only a standard that people learn; the sharpness of its pointy shape communicates an inherent sense of dangerousness. You can create tension or communicate importance with shape. Circles, for example, don’t exactly scream error. In addition, changing shape clearly communicates that an event has occurred.
- contrast—The relative brightness of adjacent items. To make an error message visible, inverting its text often helps. Instead of shading a field in pink, try making it red enough that text can change from black to white.
- color—I’ve already talked about how the use of color doesn’t much help. (Other characteristics are even less visible, so we’ll set them aside.)
Error Messaging
It is essential to communicate an error clearly. No matter how simple an error may seem, what is wrong may not be clear to a user.
Take the example I discussed earlier: A user tries to enter a phone number, but accidentally enters only nine numbers. So instead of typing 816 210 0455, he actually typed 816 210 045. This is an obvious error, right? So, you might think you could just flag the field, as shown in Figure 1, and the user would notice it.
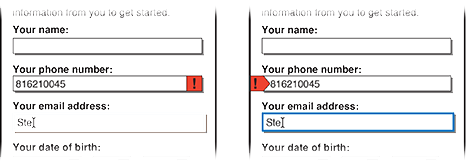
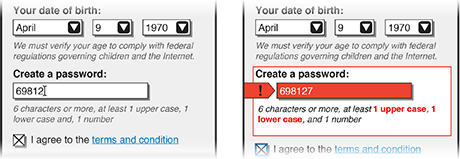
Well, this is harder than it seems. Using the principles I’ve outlined, evaluate the two designs in Figure 1. In the fairly common design solution at the left, the error flag isn’t large and doesn’t change the shape of the form field. The example on the right shows a better solution. The icon appears in the left margin where there is no other content, making it more prominent, and adds a shape, changing the overall shape of the field. The icon itself is a sharp shape, so implies problems, and helps guide the user’s eyes to the field.
Assuming you use a solution like this, once you get users to notice the error condition, they can just read the entry and fix it, right?
Wrong. Because users have difficulty discovering their own errors. Users evaluate content like this based on what they believe they typed, or what they meant to type. It is very difficult for users to overcome this bias and read what they actually typed. This is an inherent aspect of human cognition and sensing.
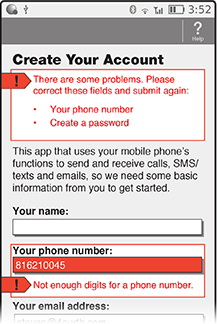
So, if you cannot design around this, what should you do? Explain the error—as clearly and specifically as possible. Do not simply say, “Your entry is in error,” but provide an informative error message that is as specific as that shown in Figure 2.
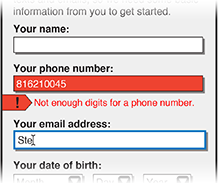
Now that you’ve attracted the user’s attention, and he’s read the message text, he has a good chance of correcting the data.
To summarize these guidelines:
- Guide the user’s eyes to the field that is in error.
- Explain the user’s error.
Error Correction
Even when designs follow the visibility guidelines, users may still have some trouble seeing their errors, so a good percentage of the time, they might simply delete and retype an entire value.
Plus, even if users see their errors, they may have difficulty correcting them. Some mobile devices present problems because they don’t provide an easy means of selecting an individual character, making users rely on tapping behaviors. Though not all, about half of all Android devices have hardware keyboards, so don’t forget to support them, too.
The single most common observed behavior is users’ rather tediously backspacing through the entire value in a field. This is painful to watch in lab studies and cannot be easy on users.
Buttons that clear fields present too many risks to be useful in solving this problem. They are not well-enough understood among users—who either interpret them as having other meanings or, not knowing what they do, just carefully avoid them.
Another behavior some designers have tried is clearing the whole field when the user gives it focus again. This is not standard behavior, so is confusing, and violates the basic principle of not destroying user data. Plus, it means users who could have corrected the error now have no opportunity to do so.
In theory, it should be possible to detect the most likely issue much of the time and put the insertion point in the right place. However, practically, this is harder to accomplish than it might seem. Plus, users do not expect this, and clearly indicating the insertion point is more difficult than you might expect.
This issue of how best to facilitate error correction is worthy of further study and guidelines may change over time as either users change their habits and expectations or we find better technical or design solutions. For now, error correction is simply a pitfall users must overcome, so simply support refocusing on the field containing the error, and select an insertion point using a platform’s default behavior.
Error Message Placement
During design, the biggest argument—aside from developers not wanting to add validation features at all—regards the placement of error messages. Neither floating layers nor notes in a column to the right of fields are generally available on mobile devices. As I said earlier, even on tablets, forms often reside in columns or other areas without sufficient space for error messages to appear to the right of fields.
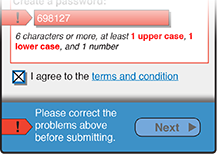
Instead, you need to make space for these messages. I suggest that you place error messages below fields, as shown in Figure 2. Regardless of their placement, showing the relationship between a field and a message is largely a matter of the use of color and spacing. However, these distinctions can very easily be lost on users, who sometimes become confused as to which field a message relates. To make their relationship clear, add visual grouping of some sort, as shown in Figure 3.
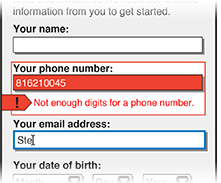
This design clearly begins to fulfill the guidelines for visibility, as follows:
- position—The field in error expands to take up more space, moving other items further down the page. This demotes the importance of the other items and forces the user to note that a change has occurred.
- size—The box around the field increases the size of the entire group, as well as its importance.
- shape—There is an additional shape in the area.
- contrast—The color of the type in the field is inverted, providing greater contrast.
- color—Yes, the field can still turn red. But don’t forget that, if your brand’s color is red, that probably wouldn’t be a helpful color for errors. In that context, the color red would not scream error.
